Having decided to make a painted hat, I had to think about style and fabric. A sunhat seemed the best style, so that I will have plenty of surface to paint, and I am going to use a basic cotton fabric that will absorb the paint. The fabric had to be pre-washed to remove any finish, otherwise the paint will not absorb. I also put the fabric through the tumble dryer to make sure there would be no shrinkage problems when painted. If you are not contemplating painting your hat, but just making a general sunhat, you do not have to bother with the washing and drying process.
I am using brown wrapping paper to make the pattern, but any wide paper will do, I sometimes use old wallpaper.
To make the pattern, I had to take my measurements. Firstly, I measured around my head just above the ears, this measured 58.5 cms. I have decided to use centimetres as they are easier to work with.
I then add 3cms to the 58.5 to give me a seam allowance. Total =60cms.
Divide this by 3.14 which equals 19.10, then divide by 2 to achieve the final figure of 9.23.
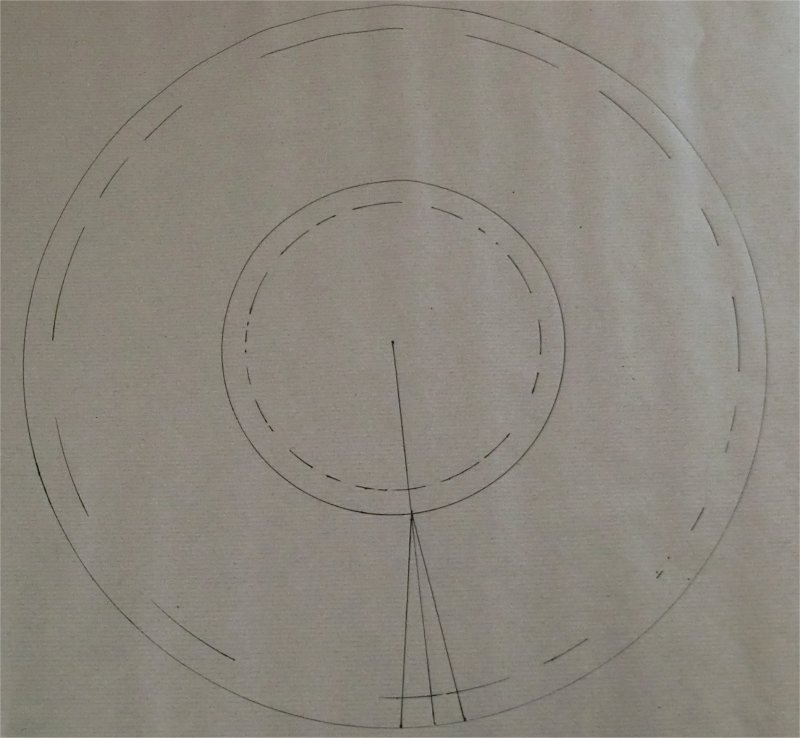
This number will be the radius of my first circle.
I drew this circle and then a circle just inside of 3cm in depth to give my seam allowance markings.
Then from the center of the circle I drew a larger circle for the brim, I have made it approximately 4 inches plus seam allowance. But you can make it however wide or narrow you wish. Remember that the wider it is, the floppier it will be.
I then drew two lines at an angle from the outside edge to the inner circle edge, this is because I want the brim to slope slightly, but you can leave it and just draw one straight line.
To make the band, I took my original head measurement of 60cms and drew a band that length by about 4.5 inches wide (whoops what happened to metric again!).
Again I slightly sloped the edges so that the band will slope up to the crown.
Once I had measured my top edge of the band (58cms) I could divide that again by 3.14, then by 2 to work out the radius for the top circle which will be the crown of the hat.
Once I had cut out my pattern pieces, I ironed them, to stop the paper curling up!
I will be cutting out the pattern once in my main fabric,
once in lining fabric and
once in interfacing.
I am going to use an iron on heavyweight interfacing. I could have used milliners buckram but it would have been too stiff for this hat.
At this point it would be best to make up the hat in a scrap fabric, so that you can make any adjustments to the design or sizing.
I have cut out the main pieces and interlined them. But I have not cut out the lining yet, as I haven't deceided what fabric to use. But this can come later.
Hang onto your pattern and measurements as they can be used as the basis for other hat patterns.
Tomorrow will be Part 2 - sewing the hat together.
Showing posts with label painted hat. Show all posts
Saturday, 7 January 2012
Friday, 6 January 2012
Painted hats and flappers!
It has been a busy morning, and thank goodness the weather is brighter with no wind. I struggle taking good photos indoors on gloomy days, and I struggle most of the time to take good pictures even though I was given a new camera for Christmas. It will take a week to read the manual, but in the meantime I just press all the buttons and hope for the best!
The picture below was taken this morning of a cute little 1940s style cocktail headband. It was made with black felted wool. I covered a wide plastic headband in the fabric and then made some pom poms for the top. The last similar one I sold was very well received, so I thought it was time to make another.
I have also been thinking about painted hats, some ideas are brewing, so I hope to post later with an update.
The 20s are meant to be the new big fashion style for the coming year, so I might use this fabulous film clip from the mid 20s as inspiration for my painted hat!
Let me know what you think x x
The picture below was taken this morning of a cute little 1940s style cocktail headband. It was made with black felted wool. I covered a wide plastic headband in the fabric and then made some pom poms for the top. The last similar one I sold was very well received, so I thought it was time to make another.
I have also been thinking about painted hats, some ideas are brewing, so I hope to post later with an update.
The 20s are meant to be the new big fashion style for the coming year, so I might use this fabulous film clip from the mid 20s as inspiration for my painted hat!
VANITY UNLIMITED
Let me know what you think x x
Labels:
1940s cocktail hat,
20s,
flapper,
painted hat
Subscribe to:
Posts (Atom)


