Monday 23 January 2012

Year of the Dragon

A very happy Chinese new year to everyone. I just hope it doesn't mean that i have to make more New Years resolutions, as i've broken the first lot already. They always seem to involve chocolate!
It has been a gloomy (weather wise) couple of days, but i have managed to get some sewing done.
This little 20s flapper tight fitting cloche hat....


I used an original 1920s pattern, although some resizing and altering was needed.
I just wish I'd had some sun, to achieve better pics.
Its available in my etsy shop here

Monday 16 January 2012

Making life easier...

It was a very busy weekend, no hats or sewing, but lots of eating and drinking with friends. It was lovely to spend time relaxing and enjoying excellent company and food.
Thinking about taking time out from a busy life made me appreciate a great email from a friend which offered tips for making life easier. Although it had lots of tips, I will share just a few here.
If you have any of your own tips and hints, do let me know,

Turn a muffin or cake tin upside down, and roll cookie dough mix over to make lovely little cases to fill with ice cream or fruit.

Fix a magnet strip on the inside of a cupboard to keep bobby pins, hair clips and such like neat and tidy.


To carry cupcakes safely, turn a box lid upside down and cut crosses.

Best wishes for now, Sara x

Thursday 12 January 2012

Hat pins

Another busy day, and I made some hat pins to go with all my hats. I really enjoyed making them, and they look very swish in their gift boxes.
they are available in my Folksy shop, and I think I will make some more. It's nice to have all things hat related.

Tuesday 10 January 2012

Silk bridal Turban

It has been the most glorious sunny day here, but I have still managed to get some sewing done...and ignore the garden for the moment.
I was lucky enough to pick up a remmnant of the most wonderful expensive pure silk fabric embroidered with little pink flowers. It reminded me of days gone by, the 20s, and ethereal floaty tea dresses, so I came up with the idea for a turban. It is unlined so that you can see the fabric really well, and I'm so pleased with the result.
It is for sale in my folksy shop, and I am thinking of making some matching shoe clips...maybe later this evening.
Thanks for looking, and any comments are always gratefully received x x

Monday 9 January 2012

Tutorial – making a hat pattern Part 3

I have now painted my hat, and I will describe how the hat was finished, and the techniques I tried out for painting.


I decided for ease to use Kuretake fabric pens for most of the design. I also use artists acrylic paints for the blue sky effect. I used the blue to just tint my water and brushed it on very quickly. It does mean that the hat get quite wet, which is why I pre washed the fabric. Also, be aware that the paint will seep through, which is why I didn't line the hat until finished. All the paints are waterproof once ironed.
I didn't bother working out a design beforehand, I just went with the creative flow. It is not a masterpiece, but is was fun to do and taught me a few things...such as, it would have been better to paint the design before assembly whilst it was still flat, and as the hat got quite wet, some of the colours ran. Although I quite liked the effect.

Once the hat was painted I cut out my lining fabric, I used a pale blue polyester cotton. Then I assembled as described in part 2.


The lining was then put inside the hat, I pinned the brims together and then ran a machine line around the edge to keep it all together. Then I trimmed the seam very close to the stitching line.


I used a pale blue 1 inch wide bias binding to edge the hat. I folded and pressed the binding in half so that it would sit nicely on the brim. As I stitched it in position I stretched it slightly so that it would follow the curve.


I really need some nice blue ribbon to go around the middle, but have just placed some of the bias binding there for the time being. When putting the ribbon in on I will stab stitch it in position going all the way through the hat to catch the lining in place.
I hope you like the finished hat, I just need some sun to wear it in now!

Sunday 8 January 2012

Tutorial – making a hat pattern Part 2

Following on from yesterdays hat pattern, I am now ready to sew the hat together.
Firstly I ran a line of stay stitching ( long machine stitches) around the seam line of the brim, just to help it stay in shape, then I sewed the seam in the brim (right sides together) and pressed open.


Then take the hat crown side and again with right sides together sew the seam together and press open.


Take the hat crown (top circle) and with right sides together pin to the hat side, easing the fabric to fit. Sew these together.


With right sides together pin and sew the bottom of the side to the inner brim. If you find it hard to stretch the fabric around, sew a stay stitch line agin around the inner seam allowance and make some small cuts into the brim seam allowance , being careful not to go further than your stitch line. Apologies, that I forgot to take a picture of this stage :(

My hat is now ready to paint!

If you wish to add lining before I get around to posting the next images, just cut all 3 pattern pieces out of your lining fabric (do not interface). Make them up exactly as the hat, so that you have 2 hats, place the lining hat inside the outer hat, pim the brim together, and sew co-ordinating bias binding all the way around the edge to join the 2 hats together. You can then decorate as desired. I will publish more on this task as my hat continues.

Saturday 7 January 2012

Tutorial – making a hat pattern

Having decided to make a painted hat, I had to think about style and fabric. A sunhat seemed the best style, so that I will have plenty of surface to paint, and I am going to use a basic cotton fabric that will absorb the paint. The fabric had to be pre-washed to remove any finish, otherwise the paint will not absorb. I also put the fabric through the tumble dryer to make sure there would be no shrinkage problems when painted. If you are not contemplating painting your hat, but just making a general sunhat, you do not have to bother with the washing and drying process.

I am using brown wrapping paper to make the pattern, but any wide paper will do, I sometimes use old wallpaper.
To make the pattern, I had to take my measurements. Firstly, I measured around my head just above the ears, this measured 58.5 cms. I have decided to use centimetres as they are easier to work with.
I then add 3cms to the 58.5 to give me a seam allowance. Total =60cms.
Divide this by 3.14 which equals 19.10, then divide by 2 to achieve the final figure of 9.23.
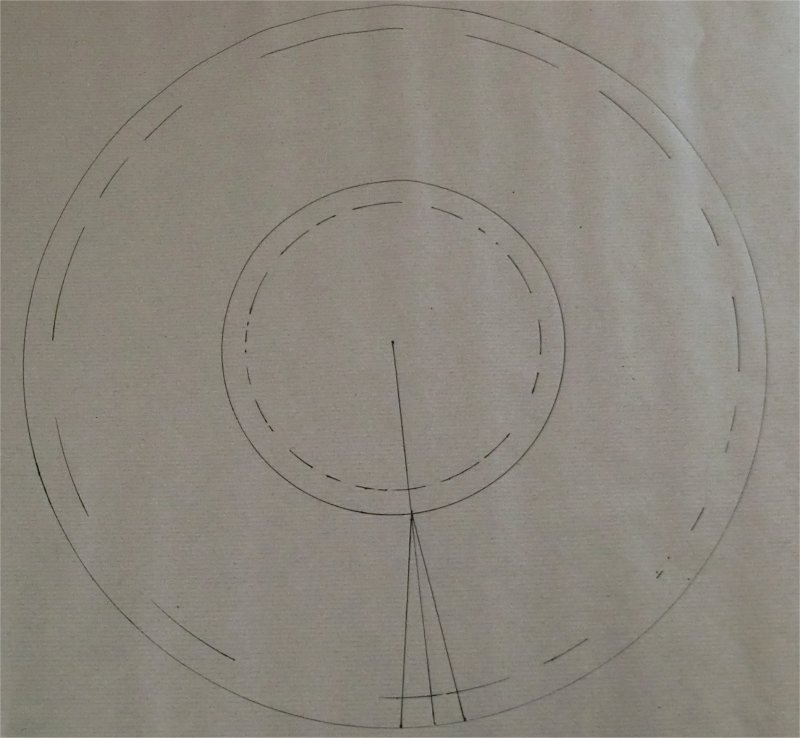
This number will be the radius of my first circle.


I drew this circle and then a circle just inside of 3cm in depth to give my seam allowance markings.

Then from the center of the circle I drew a larger circle for the brim, I have made it approximately 4 inches plus seam allowance. But you can make it however wide or narrow you wish. Remember that the wider it is, the floppier it will be.


I then drew two lines at an angle from the outside edge to the inner circle edge, this is because I want the brim to slope slightly, but you can leave it and just draw one straight line.


To make the band, I took my original head measurement of 60cms and drew a band that length by about 4.5 inches wide (whoops what happened to metric again!).
Again I slightly sloped the edges so that the band will slope up to the crown.
Once I had measured my top edge of the band (58cms) I could divide that again by 3.14, then by 2 to work out the radius for the top circle which will be the crown of the hat.


Once I had cut out my pattern pieces, I ironed them, to stop the paper curling up!


I will be cutting out the pattern once in my main fabric,
once in lining fabric and
once in interfacing.
I am going to use an iron on heavyweight interfacing. I could have used milliners buckram but it would have been too stiff for this hat.

At this point it would be best to make up the hat in a scrap fabric, so that you can make any adjustments to the design or sizing.
I have cut out the main pieces and interlined them. But I have not cut out the lining yet, as I haven't deceided what fabric to use. But this can come later.


Hang onto your pattern and measurements as they can be used as the basis for other hat patterns.

Tomorrow will be Part 2 - sewing the hat together.

Friday 6 January 2012

Painted hats and flappers!

It has been a busy morning, and thank goodness the weather is brighter with no wind. I struggle taking good photos indoors on gloomy days, and I struggle most of the time to take good pictures even though I was given a new camera for Christmas. It will take a week to read the manual, but in the meantime I just press all the buttons and hope for the best!
The picture below was taken this morning of a cute little 1940s style cocktail headband. It was made with black felted wool. I covered a wide plastic headband in the fabric and then made some pom poms for the top. The last similar one I sold was very well received, so I thought it was time to make another.


I have also been thinking about painted hats, some ideas are brewing, so I hope to post later with an update.
The 20s are meant to be the new big fashion style for the coming year, so I might use this fabulous film clip from the mid 20s as inspiration for my painted hat!

VANITY UNLIMITED


Let me know what you think x x

Thursday 5 January 2012

fabric mad....

I was only popping into town to pay some bills and buy coffee...but as nearly always happens, I saw a piece of fabric and just had to have it. It is a lovely taffeta with black flocked swirls and printed silver design. Once I decide what to do with it, I'll let you know. But I think it might lend itself to a hat! For the moment it will just be added to the stacks of fabric I already own.
I just cannot go anywhere with buying some sort of fabric, trimmings or crafty item.


I have also managed to finish a custom order for a black wool cloche...now it feels time for a glass of wine, before I tidy up the workroom ( I am such a messy milliner..lol)

Tuesday 3 January 2012

New year, new resolutions

Well, a new year and a new blog. Writing a blog has been on my agenda for some time, and at last I have made a start.
It will all look a bit basic for a while till I get the hang of chatting and musing, but I hope you will bear with me whilst it takes shape.
I have made hats now for some years (some of which can be found for sale on Folksy.com), and up until now, most have been fabric based, warm, useful hats which I hope look good as well as being functional. But I really, really want to move on to more avant garde, exciting stuff that makes a statement! So my new year resolution is too experiment more with millinery.

This is one of my hand painted hats available from www.folksy.com/shops/sewstylish


Heres a hand blocked cocktail hat


and here is a fleece hat with matching neckwarmer


I am self taught in all my crafts, and am constantly looking to learn more. With this in mind I hope to include some tutorials for those who also like to sew and create .
I am looking forward to blogging, and heres hoping everyone looks forward to reading :)