Thursday, 19 July 2012

Making a buckram fascinator - part 1

I hope this little tutorial will be of interest, as I am not very good as chatting about anything other than hats, vintage or the state of the British weather :)

This is a little buckram hat that I am making and these are the first stages. I cut 2 oblongs of white buckram fabric roughly 8 x 10 inches. Buckram is a stiffened cotton open weave fabric, and once wet it can be moulded and reshaped. I ran the pieces under the tap until they became soft enough to manipulate, then I stretched them over a polystyrene head. You don't need a hat block for this, as the hat will be one size, and just needs to have a curve to it. I stretched them on pulling and pinning at the same time to keep the fabric in place without folds. I always use 2 layers as I find it gives more body and a better finish. The starch in the fabric can make your hands sticky, and can cause the fabric to stick to your mould, so it is best to cover the mould /head with some cling film or tin foil first.

This was then left overnight to dry, it must be really dry before you remove it from the mould. Before I removed it I used a laundry pen to mark out a shape for my hat, and I decided on a small tear drop. I removed the buckram from the head and cut around my shape. The next stage was adding some wire to the edge to keep the hat firm and give a good shape. I decided to use plastic brim wire, as I don't want the hat to be bent or deformed. I stitched this in place using a zig zag stitch on the sewing machine.
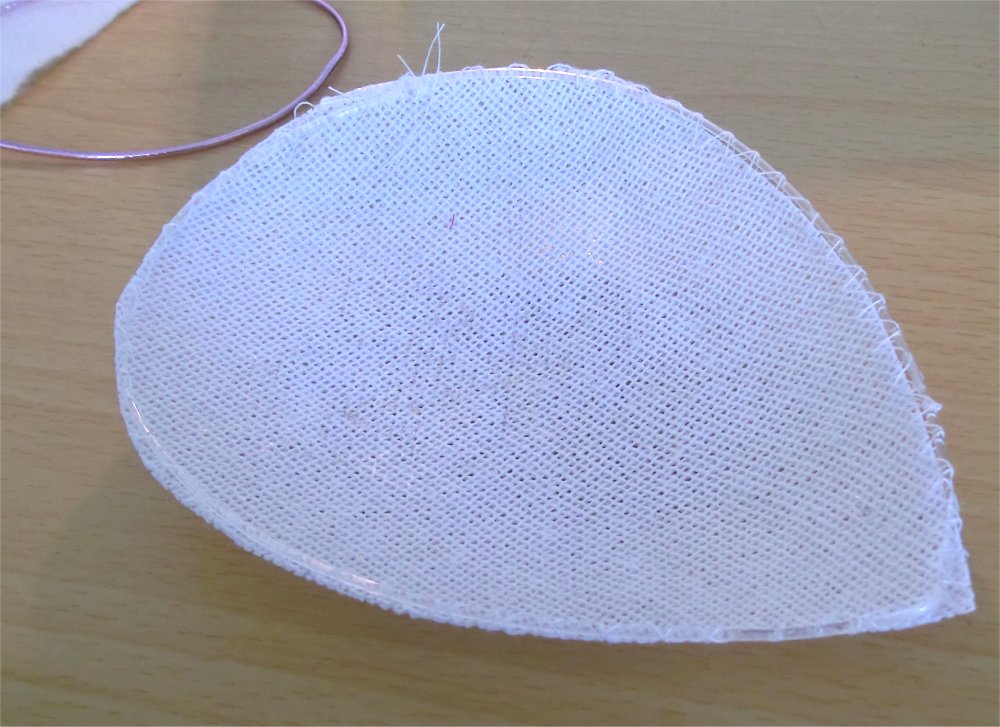
I like to add hat elastic at this stage, before I cover the base, and I had some nice shiny pink elastic, so I'm using this. I poked 2 holes either side of the base using an awl or you can use a large needle. I then thread the elastic through, make a knot and then stitch using the sewing machine to make doubly sure it won't come adrift!

Normally you would use a domette or similar fabric for covering the base, this achieves a nice smooth finish to your covering. I used a similar interlining and cut this to the approximate shape of the tear drop and fold over and roughly stitched in place. Then I sew, using a machine zig zag some bias binding around the inside of the base to give me something to sew the final cover and lining to.

Then I cut my fabric to cover the base, I have used a purple linen mix fabric. Make sure you add lots of small pleats as you go around, this gives a nice neat outer edge. I stitch the outer fabric to the bias tape that I put in place previously.

Thats all for now, but I will add part 2, which is the trimming and lining etc. I hope you enjoy my tutorials

Thursday, 21 June 2012

Made my first silk flower!

I get so excited trying something new. I never know if it is going to turn out well, but I was so into this project, that I got up at 6am to finish it!

I used a pure silk furnishing fabric, which probably wasn't the best to use for a first time go, as it was quite heavy and hard to stiffen, but once started, I just had to carry on. The petals were cut out and stiffened last night using a combination of cornflour and PVA.

I have no millinery flower tools (way too expensive), so the kitchen drawers and workshop tools came in handy.....I used a melon baller, an awl and a couple of screwdrivers!

I find millinery so gripping, just can't get enough of it lately :) The hat is not quite completed but what do you think?

I just wish our weather was better so that I could take some photos that don't look like I live in a cave, but at 7am it was pretty gloomy!

Friday, 15 June 2012

Make a turban - Tutorial

I love turbans, and think they are under rated, towelling ones are great for the beach or bath, and any turban is good for a bad hair day.

Liz and Joan always make them look good!

This is just an easy peasy turban that took me about 40 minutes to make...

This style of turban works best with stretch fabric, and the pattern pieces should be cut on the bias. I have cut 3 pieces out of some funky floral stretch that has been in the fabric stash for a while.

In total I cut 3 rectangles, one 24" x 10", one 24" x 5" and one 4" x 5", This makes a large head size (23 - 24 inches) so if you want a medium size just make the 2 main pieces 23 x 9 and 23 x 4 .

The long thin band should be folded in half wrong sides together and sewn to one long edge on the largest piece. I used an overlocker, but if not, its best to use a stretch stitch.

Once the band is stitched on, fold the turban in half right sides together, and stitch around the edge forming a curve in the corner, and leaving a 3/4 inch gap at the end.

Turn the hat right side out and form 3 pleats at the back of the hat, you will need to adjust these to suit, and try it on to get the best effect. Then stitch these pleats down by 'stitching in the ditch'.

The small pattern piece that you have left should be folded right sides together and sewn to form a nice band when turned out, This band is then fed through the hole left at the front seam, the fabric gathered up and the small band ends sewn together. I also made a little bow to thread through the band, but this could be removed it needed, I didn't bother stitching it in.

you could get new looks by adding a brooch or decoration to the front.

Let me now if you make one. I think I will make some more now, as the weather here is still very dismal and rainy, so it's much more fun to stay in and sew!

Thursday, 14 June 2012

Workspace and tools

I am so untidy when sewing, this seems really strange to me because I am practically OCD about the rest of my house. I love things to be clean neat and tidy...expect when I get the fabrics out, then they are all over the floor!

Perhaps its because I don't always have a fixed idea in my head for a design and often its the fabric or trim that sparks an idea. Sometimes this works and sometimes it doesn't. But being creative often leads to part finished projects, so I have hidden all of these away until I can think what to do with them!

I am lucky in that I have a space to work, and somewhere to put everything. It is really the guest bedroom, but being a large room and having a man who is handy with DIY, I was able to snatch a largish area.

I use a computer workstation to keep my Pfaff sewing machine and Husqvarna overlocker on, and the lower shelf houses the laptop. I made sure I fixed lots of extra lighting above the table, and lots of electrical sockets underneath. I can never have enough plugs!

The curtains pull across the work area if someone is staying over, and then they don't have to stare at my clutter all night!

I never store my fabrics according to colour or weight or just about any sort of system, and as I keep lots of small pieces (ideal for hats)it does have a tendancy to spill over sometimes.

I did try and tidy a bit to take a photo, I also thought I would take a photo of my favourite tools whilst I was at it, and here they are

From the left; Calculator, a must have for drafting my own patterns

Bias binding maker - I love, love, love this little gadget. I will be making some bias in a future tutorial so I will explain how to use it then.

Magic laundry pen- This is great for marking out fabric, as it disappears like magic after a little while.

Stitch/seam ripper - I have loads of these, I am always putting one down and can't find it!

Tailors chalk - if the pen isn't practical

Rotary cutter - great for straight lines or curves, especially great when making bias binding

Scissors - not for cutting paper or anything other than fabric

Fluff sticky roller - so great for cleaning any bits off at the end of a project.

and they are all on top of my large cutting mat, which saves my table getting scratched and really useful when I need dead straight lines.

I did forget to add things to my list like my French Curves, but I love tools so I could have gone on forever...adding in....glue gun.....white cotton gloves (used when sewing fine fabrics, 'cos my hands are rough!)...etc..etc

I would of taken a picture of my specs, as I can't do anything without them, but I had them on at the time :)

Monday, 30 April 2012

Bramcost pattern pillbox tutorial

1950s Pillbox style hat pattern from Bramcost publications tutorial

This tutorial is for a lovely 50s pillbox, the pattern comes from Bramcost, who sell vintage patterns and more, the link to this pattern can be found here:

http://www.facebook.com/Bramcost.Publications

This hat should take about 90 minutes to make for the experienced seamstress.

Print out the 4 page pattern. The pattern is sized for a 22 inch head and uses ½ inch seam allowance.

TIP: When I made the hat I found that the top was too big, and I needed to make the hat band larger for my head.It states cut a half circle with your compass set to 5 inches, I found 4.75 inches to be better, if you still want a 22 inch hat. If you need the hat to be larger cut the head band pattern out half an inch longer.

The pattern instructions are quite clear and the headband is all ready to cut out and selloptape together ( don't overlap the edges or the band will be too small), you only have to measure and cut the top section (crown).

The good thing about hats, is that you don't need much fabric, so I found a nice off cut of lavender Harris Tweed that I am using for my hat. I am cutting the lining out from a pretty lilac flower print cotton.

TIP: If you are making the hat out of very heavy fabric, you don't really need any interlining, just cut your fabric and lining pieces out. But I am using lightweight fusible interfacing for this hat, as I like it quite stiff. Also be aware that if you use a thin fabric, the hat will come up larger, and will be more of a beret style.

TIP: When cutting the crown sections, make sure you mark the middle point (where your seam starts). I use a disappearing Laundry marker pen from Kuretake. It vanishes after a few hours or can be erased with water!I have also used a pin in the picture, as Lavender is the worst colour to photograph!

Before sewing you should have 4 pieces, 2 x crown and 2 x side band.

With right sides together, sew the seams on the back of each side band, trim and press open. Then sew the seams on the crowns (circles), again trim and press open. This will now be cone shaped.

Now pin the headband fabric to the cone, making sure you use the longer (top) edge of the head band. You will have to ease the head band fabric to fit. Sew all the way around and trim. Then do exactly the same with the lining pieces, making sure right sides are together.

Turn the lining right side out, and place inside the hat (so that both right sides are together).

Sew together all around the bottom edge leaving a gap of approximately 3 inches. Trim seam.

Pull the hat through the lining using the gap. Press all seams. You can either slip stitch the gap together, or tack and then top stitch all around the lower edge ( which I have done).

You can then add a petersham ribbon band to the inside bottom edge by hand, if required. TIP: adding a band will decrease the size again slightly.

You can now decorate the hat to suit. As I wanted a button on the top, I used an old button and cut a circle of fabric big enough to go over the button, I ran a long stitch around the edge and drew the stitches up, thereby covering the button. I then stitched firmly in place.

And now your hat is finished!! I hope the above all makes sense, but if not, do let me know :)

Wednesday, 15 February 2012

Red berry hat

Well, I am not very good up keeping up with blogging! Perhaps it's because I spend too much time making things?
And I really must tidy up my work area, I am so untidy when making something. I pull all the ribbons and fabrics out, and spread them all around, and still can't make up my mind.
But I did come across some lovely resin blackberries which I bought some time ago.I decided to make them into this little hat. I am really pleased with the result, even if everyone I have shown it to thinks it is very Christmassy!!

You can see it in my etsy shop here

Sunday, 5 February 2012

Rock star chick

Where does the time go? It has been a busy week, but not with making or sewing :(
The OH came down with shingles ( I didn't realise what a painful condition this is) but luckily he got to the GP early and seems to be on the mend.
I have spent all morning teaching my mum (in her late 70s) how to use her new computer and she loves it!!! Hurrah, so I'm hoping she will pick it all up fairly easily.
Then home to make my 8 year old grandaughter into a Rock chick, she is performing in a 'do' on Monday with the rest of her class, a song and dance routine to 'we will rock you'. She really wanted to look the part, so I have spent the last hour slashing a new black t-shirt, adding diamonte and chains and making feather trailing hair clips.
I don't know if this is the rock chick look, but I have done my best...now I keep my fingers crossed. x x x